Accessing containerised applications for debugging in Kubernetes is still far from efficient. Developers often struggle with slow, permission-heavy workflows that require kubeconfig access, temporary tunnels, or exposing internal services unnecessarily. What should be a simple debugging step frequently becomes a complex and insecure process involving multiple tools, configurations, and network layers.
Common Pain Points in Current Methods: #
kubectl port-forwardand similar commands — require access to the cluster’s kubeconfig. Sharing this file between developers or automation scripts introduces security and permission risks, and it only works as long as your API server and context are reachable.- NodePort services — can expose a container quickly, but the application might not yet be ready or healthy, resulting in confusing connection errors and false negatives during debugging.
- Ingress controllers — provide structured HTTP routing, but are often overkill for quick debugging. They require configuration, DNS, TLS, and annotations before you can even reach your test endpoint.
- LoadBalancer services — are the proper, production-grade way to expose workloads externally, but spinning up cloud load balancers just to inspect container behaviour is expensive, slow, and unnecessary before debugging is complete.
What if we can directly access the container network for debugging? #
VeilNet is certainly not the only tool capable of providing direct access to container networks—solutions like Tailscale, ZeroTier, or even custom VPN sidecars can achieve similar outcomes. However, what sets VeilNet apart is its simplicity. It requires just a single lightweight deployment, with no additional operators, sidecars, ACL configuration, or kubeconfig sharing. Within minutes, developers can securely reach any container in the cluster as if it were part of their local network—no tunnels to manage, no complex routing rules to maintain, and no risk of overexposing services during debugging. Additionally, it can automatically scale up to support a large team of developers without any intervention.
Let’s get started #
This guide will assume you have a Kubernetes cluster deployed. If not, you are welcome to follow our guide here to set up a Multi-Cloud super cluster, which is overkill for this demo purpose, but who said devs can not have fun!
Create a Multi-Cloud Kubernetes
If you follow the above guide, you should have an Nginx web server deployed in your Kubernetes. If not, here is a simple manifest you can use for this guide:
apiVersion: apps/v1
kind: Deployment
metadata:
  name: nginx-test
  labels:
    app: nginx-test
spec:
  replicas: 1
  selector:
    matchLabels:
      app: nginx-test
  template:
    metadata:
      labels:
        app: nginx-test
    spec:
      containers:
      - name: nginx
        image: nginx:latest
        ports:
        - containerPort: 80
        resources:
          requests:
            memory: "64Mi"
            cpu: "250m"
          limits:
            memory: "128Mi"
            cpu: "500m"
You probably noticed that we did not include any service definition. This is on purpose to demonstrate that we will be able to directly access the container network to reach this container.
Step 1. Register your VeilNet account and generate a registration token. #
Simply head to
Create your account for free, and you will see the following page:
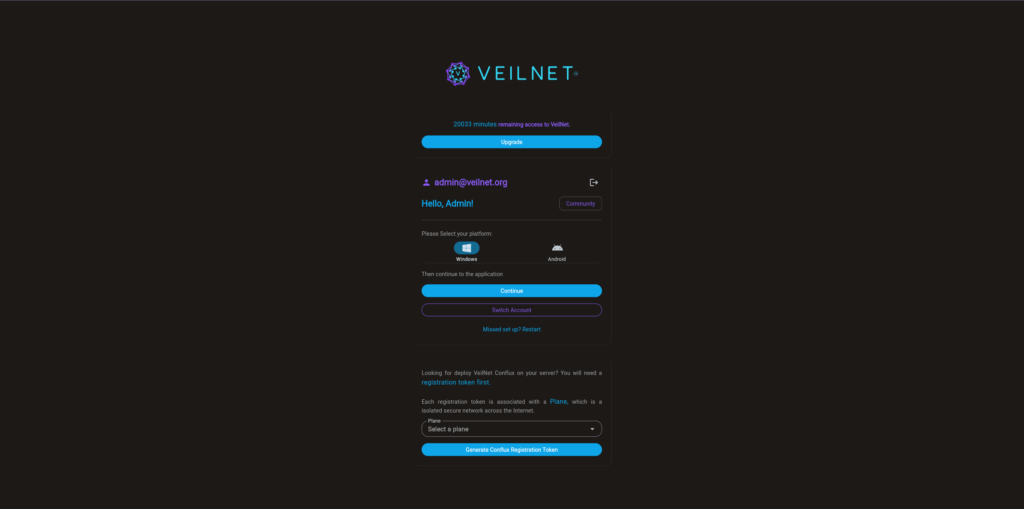
Simply select a Plane (aka, an isolated secure network in VeilNet), then click on the “Generate Conflux Registration Token” button. A unique token will be created for you, which is valid for 365 days.
Please save this token securely, because it will not be shown to you again. You can always create a new token next time you log in, but we do not recommend creating multiple tokens. (Creating multiple API tokens for the same purpose is always a bad idea for security reasons.)
Step 2. Deploy VeilNet Conflux in Kubernetes #
At the moment, we do not have a Kubernetes operator like Tailscale for this purpose, and we do not plan to do so. A Kubernetes operator will introduce custom resources and a manifest file format that you will have to learn. Tailscale needs an operator to communicate with their API server and coordination server to be properly configured and working. VeilNet, on the other hand, does not need those. Its AI-powered routing algorithm eliminates the need for a coordination server. Each instance can simply function by itself while cooperating with other instances belonging to you. This also means:
- Horizontal Scaling: Yes, VeilNet Conflux can horizontally scale up and down with a standard Kubernetes scaling policy. No operator or special configuration needed, it just works.
- Respect Kubernetes Network Policy: VeilNet Conflux is just another container in your cluster. Although it provides direct access to the internal container network cluster-wide, it respects and follows standard Kubernetes Network Policy. So it will not introduce any additional overhead or workflow.
Here is the manifest for deploying VeilNet Conflux, which also includes a horizontal scaling policy (let’s assume you have a large team of developers who will all access the container network at the same time):
apiVersion: apps/v1
kind: Deployment
metadata:
  name: veilnet-conflux
  labels:
    app: veilnet-conflux
spec:
  replicas: 1 # will be managed by HPA below
  selector:
    matchLabels:
      app: veilnet-conflux
  template:
    metadata:
      labels:
        app: veilnet-conflux
    spec:
      containers:
      - name: veilnet-conflux
        image: veilnet/conflux:beta
        imagePullPolicy: Always
        securityContext:
          privileged: true # required for conflux to create TUN interface
        resources:
          requests:
            memory: "512Mi"
            cpu: "250m"
          limits:
            memory: "512Mi"
            cpu: "500m"
        envFrom:
          - secretRef:
              name: veilnet-conflux-secret
---
apiVersion: v1
kind: Secret
metadata:
  name: veilnet-conflux-secret
type: Opaque
stringData:
  VEILNET_REGISTRATION_TOKEN: <registration_token> # the token you obtained in step one
  VEILNET_PORTAL: "true"
  VEILNET_CONFLUX_SUBNETS: "10.42.0.0/16" # comma separated list of subnets, k3s container network is default to 10.42.0.0/16
---
apiVersion: autoscaling/v2
kind: HorizontalPodAutoscaler
metadata:
  name: veilnet-conflux-hpa
spec:
  scaleTargetRef:
    apiVersion: apps/v1
    kind: Deployment
    name: veilnet-conflux
  minReplicas: 1
  maxReplicas: 5
  metrics:
  - type: Resource
    resource:
      name: cpu
      target:
        type: Utilization
        averageUtilization: 70
  - type: Resource
    resource:
      name: memory
      target:
        type: Utilization
        averageUtilization: 80
The most important configurations are:
- VEILNET_REGISTRATION_TOKEN: This is the token that will be used to authenticate with VeilNet Guardian (Our Authentication API server) to allow you to create a new VeilNet Conflux instance.
- VEILNET_CONFLUX_SUBNETS: This is a comma-separated list of any network you would like VeilNet Conflux instances to forward.
Simply copy the content and save it as a “YAML” file. Assume the file name is “conflux.yaml”, then run:
kubectl apply -f ./conflux.yamlThat’s it, all you need on Kubernetes. #
Step 3. Connect to the Container Network from your device #
You need the VeilNet Conflux CLI software. The beta version can be downloaded from:
- Windows (We did not digitally sign the beta version, so it may trigger anti-virus software. You can always run in a VM if you have concerns.)
- Linux
Then, please run the following command in order:
./veilnet-conflux.exe # start the application

# Please open another powershell or terminal
./veilnet-conflux.exe register -t <registration_token> -p # connect to VeilNet in Portal mode (split tunnel)

# to stop and clean up
./veilnet-conflux.exe unregisterchmod +x veilnet-conflux # make it executable
sudo ./veilnet-conflux # sudo is needed for TUN creation
# Please open another terminal
./veilnet-conflux.exe register -t <registration_token> -p # connect to VeilNet in Portal mode (split tunnel)
# to stop and clean up
./veilnet-conflux unregisterYou can also install VeilNet Conflux as a system service. To do so:
# on windows
.\veilnet-conflux.exe install

# on linux
sudo ./veilnet-conflux install

# to uninstall on windows
.\veilnet-conflux.exe remove

# to uninstall on linux
sudo ./veilnet-conflux remove
Then use the same commands of “register” and “unregister” to connect and disconnect. The difference is that, as a system service, your connection will run in the background and survive after your machine reboots.
All Done! #
Now, you can simply open your browser, type in “http://<nginx_container_ip>“, and you will magically connect to the container network and gain direct access to the nginx container!
The same goes for any other container you have deployed! You can debug to your heart’s content anywhere, any time. You could even run networking security tools directly in the container network without the need of any special Kubernetes operator!
Let’s have a quick test! #
Assume your nginx container has the IP address 10.42.0.10, then you should be able to see the following results with a “curl”:
curl -v http://10.42.0.10
*   Trying 10.42.0.10:80...
* Connected to 10.42.0.10 (10.42.0.10) port 80
> GET / HTTP/1.1
> Host: 10.42.0.10
> User-Agent: curl/8.5.0
> Accept: */*
>
< HTTP/1.1 200 OK
< Server: nginx/1.29.3
< Date: Wed, 29 Oct 2025 06:13:00 GMT
< Content-Type: text/html
< Content-Length: 615
< Last-Modified: Tue, 28 Oct 2025 12:05:10 GMT
< Connection: keep-alive
< ETag: "6900b176-267"
< Accept-Ranges: bytes
<
<!DOCTYPE html>
<html>
<head>
<title>Welcome to nginx!</title>
<style>
html { color-scheme: light dark; }
body { width: 35em; margin: 0 auto;
font-family: Tahoma, Verdana, Arial, sans-serif; }
</style>
</head>
<body>
<h1>Welcome to nginx!</h1>
<p>If you see this page, the nginx web server is successfully installed and
working. Further configuration is required.</p>

<p>For online documentation and support please refer to
<a href="http://nginx.org/">nginx.org</a>.<br/>
Commercial support is available at
<a href="http://nginx.com/">nginx.com</a>.</p>

<p><em>Thank you for using nginx.</em></p>
</body>
</html>
* Connection #0 to host 10.42.0.10 left intact
If it fails for the first time, do not worry. This is because VeilNet is a non-mesh overlay VPN, the secure tunnel is only created on demand, and dissolves on idle to prevent any potential attacking surface. Therefore, the first couple of packets may take significantly longer than usual, but it should become normal within a couple of seconds.
Now, simply set up the VeilNet Conflux service on your machine or your team members. You no longer have to share KubeConfig or create an ingress just for debugging. If this guide has helped you, please give us some feedback! We will offer a free Private Plane for early adopters during beta.
FAQ #
How could this even work? Does it require my Kubernetes node to have a public IP? #
No! You do not need any public IP, either for the Kubernetes node or your machine. Similar to what Tailscale can do, VeilNet is better at NAT traversal. VeilNet not only utilises Cloudflare TURN for bypassing symmetric NATs where direct P2P is not possible, but VeilNet also support multi-hop paths. It means even if you are behind a highly restricted network (such as the GFW of China), VeilNet Conflux will intelligently find another Conflux as a relay to form a circuit similar to “The Onion Router” (TOR). So you will always be connected. 🙂
Additionally, VeilNet routing is powered by AI and non-IP-based. So, from your machine’s perspective, it is “simply physically connected with the container network“.
Is this safe? Do I have to worry about using the “Beta” Plane? #
Yes, it is as safe as a secure tunnel can be. VeilNet is the only solution that utilises both Kyber KEM and Dilithium DSA. Not only is your traffic encrypted against quantum computers, but it can also not be altered even if it is relayed, thanks to Dilithium Signature, which is also a quantum-resistant digital signature.
Others using the same “Beta” Plane will not be able to access your container network. VeilNet utilises identity-based access control with a random signature per VeilNet Conflux. VeilNet Conflux in the portal, although it may relay traffic for other users in the “Beta” Plane, the packets can not be inspected (Kyber KEM + AES-GCM 256) or altered (Dilithium DSA). Traffic to subnets from different users is not possible unless they have joined a team together. (If you would like to test the team functionality, please contact us.)
Can I implement a service mesh by connecting container networks from different clusters together? #
Yes, you absolutely can! VeilNet is probably the best solution for it as well, thanks to its capability of horizontal scaling! Just make sure your container network in a different cluster is not overlapping, and remember to change the manifest!
We will create a guide for it soon. 🙂


